
Adobe Portfolio - Add Content To Page
In this tutorial, we will explore the various options for adding content to a page in Adobe Portfolio.
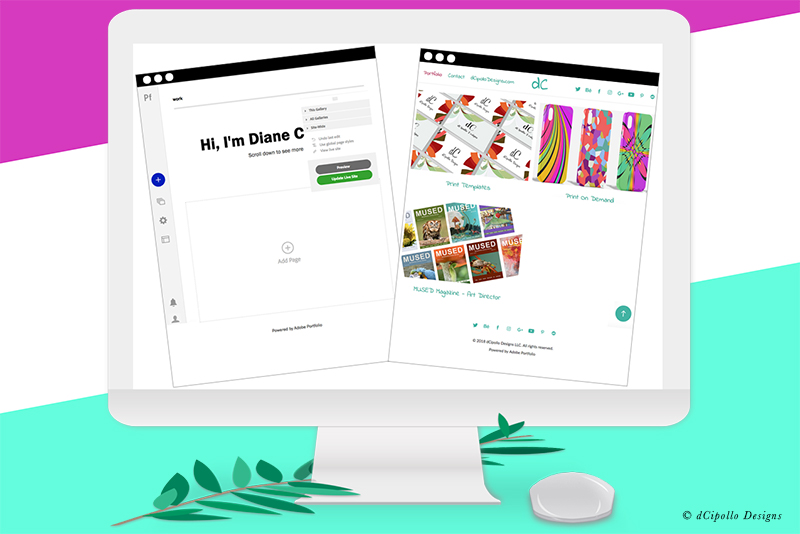
In previous tutorials, we have set the styles, width, height and margin options for all levels of the Portfolio site, including site-wide options, gallery options and page options. Also, we have added three pages, and the page cover graphics, to our default Portfolio gallery (see screenshot).
Now, let's pick one of the pages and add some content. The Adobe Portfolio Editor is a modular system. You can think of each object on the page, whether that is a text box, image, photo grid or form, as an independent box. Each box has the same width, height, margin and style options as the site-wide, gallery and page options.
At this point (see screenshot), our page is blank except for the top nav, page header, footer and Back to Top button. In the center is a new box with an icon menu containing a listing of the type of objects we can add to the page. You will also notice the Add Content tab in the Floating Remote (see screenshot), which contains the same options. Finally, if you have more than one page and have the More In This Gallery option toggled on, you will see, at the bottom left, the thumbnails for your other pages in this gallery (see screenshot).
We can add several types of content, including files, text, embed, Lightroom photos, Creative Cloud files, photo grid and form. With all these options, you can build a page unique to yourself. So, let's discuss some of these.
Add A Text Box
Our first object on the page will be a text box, which will contain a title for the photo grid that will follow.
Next, I want to add a photo grid that will display three images, the cover spread, page spread and website screenshot for the latest issue of MUSED. But the icon menu is gone! Let's click the Plus icon at the bottom edge of the text box (see screenshot).
https://www.myportfolio.com/editor/portfolio
https://www.myportfolio.com/switch-theme
Copyright 2018 Adobe Systems Incorporated. All rights reserved. Adobe product screen shot(s) reprinted with permission from Adobe Systems Incorporated. Adobe, Photoshop, Photoshop Album, Photoshop Elements, Illustrator, InDesign, GoLive, Acrobat, Cue, Premiere Pro, Premiere Elements, Bridge, After Effects, InCopy, Dreamweaver, Flash, ActionScript, Fireworks, Contribute, Captivate, Flash Catalyst and Flash Paper is/are either [a] registered trademark[s] or a trademark[s] of Adobe Systems Incorporated in the United States and/or other countries.
In previous tutorials, we have set the styles, width, height and margin options for all levels of the Portfolio site, including site-wide options, gallery options and page options. Also, we have added three pages, and the page cover graphics, to our default Portfolio gallery (see screenshot).
Now, let's pick one of the pages and add some content. The Adobe Portfolio Editor is a modular system. You can think of each object on the page, whether that is a text box, image, photo grid or form, as an independent box. Each box has the same width, height, margin and style options as the site-wide, gallery and page options.
At this point (see screenshot), our page is blank except for the top nav, page header, footer and Back to Top button. In the center is a new box with an icon menu containing a listing of the type of objects we can add to the page. You will also notice the Add Content tab in the Floating Remote (see screenshot), which contains the same options. Finally, if you have more than one page and have the More In This Gallery option toggled on, you will see, at the bottom left, the thumbnails for your other pages in this gallery (see screenshot).
We can add several types of content, including files, text, embed, Lightroom photos, Creative Cloud files, photo grid and form. With all these options, you can build a page unique to yourself. So, let's discuss some of these.
Add A Text Box
Our first object on the page will be a text box, which will contain a title for the photo grid that will follow.
- Click the Text icon to add a text box above the icon menu and just under the page header.
As you can see, the icon menu has disappeared and is replaced with an empty text box (see screenshot). By default, this box is 800 px wide. But I want my modules to be 1200 pixels, which is the total width for the site. - To widen the text box, click the pencil icon and choose Width & Alignment (see screenshot).
As mention earlier, the default width of the text box is 800 pixels. If we increase the percentage to 100%, the box will be only 800 pixels wide. So, we also need to increase the Max Width to the same setting we used previously for the site-wide, gallery and page options, which was 1200 pixels. - Click the Width & Alignment link to open the panel (see screenshot). Set the Max-Width to 1200 pixels.
Next, let's add and style some text. - Add your text into the box. Select the text to open the pop up style bar and style the text (see screenshot).
Next, I want to add a photo grid that will display three images, the cover spread, page spread and website screenshot for the latest issue of MUSED. But the icon menu is gone! Let's click the Plus icon at the bottom edge of the text box (see screenshot).
- Click the plus icon on the bottom of the text box a choose Photo Grid.
As you can see, we can upload files or import images from Lightroom or Creative Cloud (see screenshot). - Click the icon to upload your images.
Now we can customize the photo grid. Click the pencil icon at the left edge of the photo grid box, to open the menu (see screenshot). We can change the width, margins or delete the grid. We can also reorder the content on this page. But now, let's see how we can edit the grid. - Click Edit Grid from the menu.
In the Edit Grid window (see screenshot), we have two menus. With one menu we can order the images, by ascending, descending or another order (custom). And with the other menu we can add more images. You can also drag the image thumbnails to reorder the images or click the X icon on the thumbnail to delete an image (see screenshot).
Let's click the Preview button in the Floating Remote, to see how the grid looks. When the page loads, the grid displays the images that we uploaded. When you click on an image in the grid, it will open in to a lightbox overlay.
https://www.myportfolio.com/editor/portfolio
https://www.myportfolio.com/switch-theme
Copyright 2018 Adobe Systems Incorporated. All rights reserved. Adobe product screen shot(s) reprinted with permission from Adobe Systems Incorporated. Adobe, Photoshop, Photoshop Album, Photoshop Elements, Illustrator, InDesign, GoLive, Acrobat, Cue, Premiere Pro, Premiere Elements, Bridge, After Effects, InCopy, Dreamweaver, Flash, ActionScript, Fireworks, Contribute, Captivate, Flash Catalyst and Flash Paper is/are either [a] registered trademark[s] or a trademark[s] of Adobe Systems Incorporated in the United States and/or other countries.

Related Articles
Editor's Picks Articles
Top Ten Articles
Previous Features
Site Map
Content copyright © 2023 by Diane Cipollo. All rights reserved.
This content was written by Diane Cipollo. If you wish to use this content in any manner, you need written permission. Contact Diane Cipollo for details.


